If you have a passion for photography, then there’s a good chance you shoot more photos than you’ll ever manage to work on. In this article I offer a practical way for you to work through a backlog of photos using Adobe’s Lightroom Classic. And with the Covid-19 pandemic disrupting travel and keeping us all at home, there’s no better time to take on the challenge.
Table of Contents
Introduction
I made the switch to digital photography back in 2003, when revolutionary new digital SLR’s like the Canon EOS 10D and the Nikon D100 were launched. For the first time, it allowed photographers to ditch the often painful process of shooting on slide film. No more changing film after 36 shots; no waiting for photos to be processed; and, of course, no film and processing costs. We could shoot to our hearts’ content!
This represented a landmark shift in photography, but it also brought about a new problem: we were suddenly dealing with a flood of images. Faced with the laborious task of identifying a few “winners” amongst a sea of mediocre shots, at first I lacked the discipline to sit down and work painstakingly through all the photos I could now take. I would rather be out taking more photos, after all.
Inevitably, a substantial backlog of photos built up. Entire photo trips lay untouched for years on a 2-terabyte disk. Even today, I never seem to have the time to work through all of the photos that I take.
So recently (and spurred on by the Covid-19 lockdown) I decided to make a real effort to work through my backlog of unedited shots, in the hopes of uncovering some hidden gems. This article explains how I did it, and perhaps more crucially, how I plan to prevent a backlog from building up again in future.
Adobe Lightroom, or whatever
I’ve been using Adobe Lightroom “Classic” ever since the first beta version was released in 2006, so I’ll be explaining my workflow from a Lightroom user’s perspective. That being said, you can surely adapt the ideas from this workflow to use with any decent software, and not just with images but with any digital medium, such as video, audio and illustrations.
Full disclosure: I’m an Adobe Stock contributor, and as part of that arrangement I do now get a free subscription to their software. But I’m not endorsed by Adobe to promote them in any way.
Where to start?
When working through a large database of photos, my approach can be broken down into four steps that I’ll cover in more detail:
- Get all your photos into one place. That means one Lightroom catalogue. (Despite what you might read elsewhere, I have never found this to effect performance, at least not for <100,000 images);
- Organise the photos into sets of a manageable size;
- Prioritise these sets and work through them in priority order;
- Have a workflow to shortlist and edit the best photos in a set, then to mark the set as “done”.
I cannot stress enough the importance of step three, i.e. to prioritise your sets of photos. I had a big “light bulb” moment when I realised that choosing not to spend time on anything but my most promising work is the key to getting my best photos edited, and freeing up time to go on to take better photos. There will never be enough time to edit all your sets of photos.
There are lots of different ways to implement this in practise, and what works for you may be different to how I approached the problem.
So I’m going to start by outlining a really simple approach that you can use, especially if your backlog isn’t too overwhelming. This isn’t actually the method I ended up using, (for reasons that I’ll outline shortly,) but everyone’s needs are different, so it may work for you.
The simple approach: use folders or collections with colour labels
There’s a good chance you already have your photos organised into folder, either by date or by some other meaningful system. (If you don’t, then you may want to check out my post on folder and file naming conventions for photographers.) So working through photos, one folder at a time, may seem like a logical place to start. (Lightroom collections can be used in a similar manner, if you prefer.)
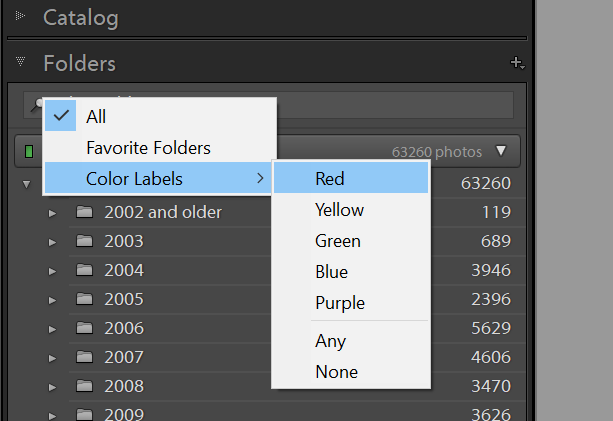
A fairly new feature in Lightroom is the ability to assign colour labels to a folder (and to collections too.) This allows you to go through each folder and give it a different colour based on priority, or another to mark it as “done.” Here’s a suggested scheme:
- Red – Top priority;
- Yellow – The rest;
- Blue – Defer; (This is for folders of photos that you know are mediocre, but you can’t quite bring yourself to simply dismiss or delete.)
- Green – Done.
It is then really easy in Lightroom to filter folders by their colour label. Simply click on the magnifying glass in the “Filter folders” field, as shown below:
This approach may be all you need to work though a catalogue of photos. However, I personally found it to have limitations that led me to use a different method altogether. I’ll explain that method in detail. First, however, let me explain the limitations that led me to look for another way.
The limitations of using folders or collections with labels
I started using the method described above a few years ago. (Although Lightroom didn’t have colour labels for folders back then, so I maintained a spreadsheet with a list of folder names instead.) It just didn’t work for me, and here’s why:
The first thing I found when working through a folder is that the photos had mixed priorities. There might be a series of photos I shot in the morning that I’m really excited about, and want to prioritise. Later that day, or even a few minutes later, I took more photos that weren’t so good. I didn’t want to ignore them, but they weren’t of the same priority. What to do? I found myself editing more photos than I really ought to, just so that I could mark that folder as “done”.
One solution might be to divide the folder into smaller sets, either by physically moving photos into subfolders, or by using Lightroom collections instead. Neither solution is ideal, and both methods quickly become unwieldy:
- Physically moving photos on a disk is never a good idea: it can mess up your backups, and by moving photos around you risk losing them. I much prefer my folders to be unchanging, like a time capsule (or a film canister if you prefer).
- The alternative – to use collections – is not much better. I tried this and quickly realised it meant duplicating my folder structure just so that I could divide it up further. It’s not helped by the fact that Lightroom has only limited tools for organising photos into collections. It can be a little clumsy to add, move and remove photos without making mistakes. Things got real messy, real quick. The upshot is that photos can too easily get lost in your organisation structure, or end up in more than one collection unintentionally.
A better way: using metadata
Organising photos with a rigid folder structure reminds me of the bad old days of Windows DOS, before we all knew about things called search engines and hashtags. This got me thinking: why not use metadata to batch up my photos?
So I landed on a method that seemed much more organic and free-form than using either folders or collections.
Keywords were the obvious first choice of metadata, but I already use them for, well, for keywords. I wanted a metadata field that I could use uniquely to assign a photo to a specific set.
Just the job: the Job Identifier
It just so happens that there is a little-known metadata field called “Job Identifier” (sometimes called “Transmission Reference”). It doesn’t appear in the default metadata panel, but you can find it in the IPTC panel. If you want it to appear more prominently, then please see my article on how to customise the metadata panel in Lightroom.
The crucial thing about Job Identifier is that, unlike most other metadata fields, it can be selected in Lightroom’s filter bar. (Shortcut key \ to enable the filter bar.) Click on a column header in the filter bar and you’ll see it is called simply “Job”. This makes for a really powerful way to describe and organise sets of photos:
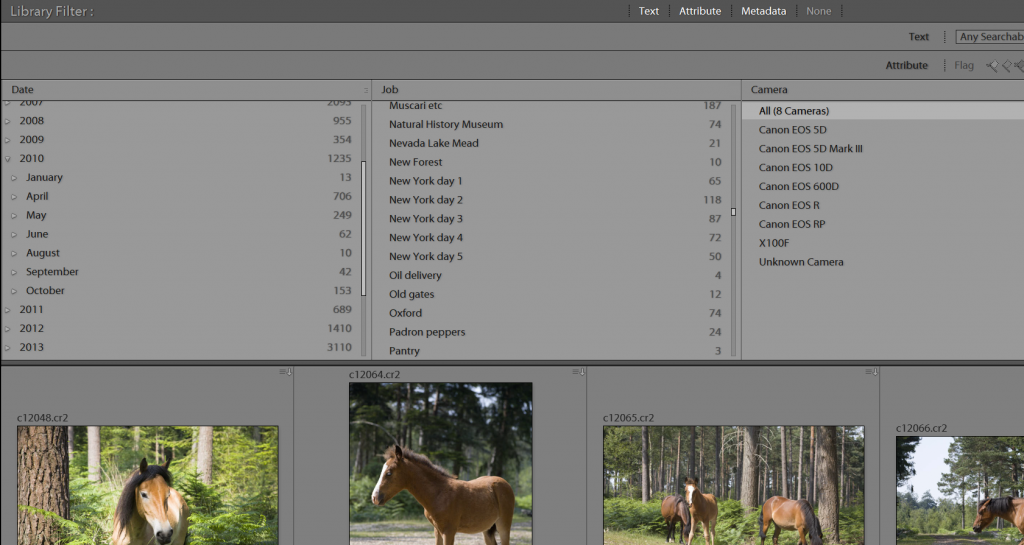
For me this seemed to be the perfect solution. I can select folders and collections as required, and/or filter by year, month or day. Then in the filter bar I see all the “Jobs” within that selection, as well as photos with no Job Identifier assigned.
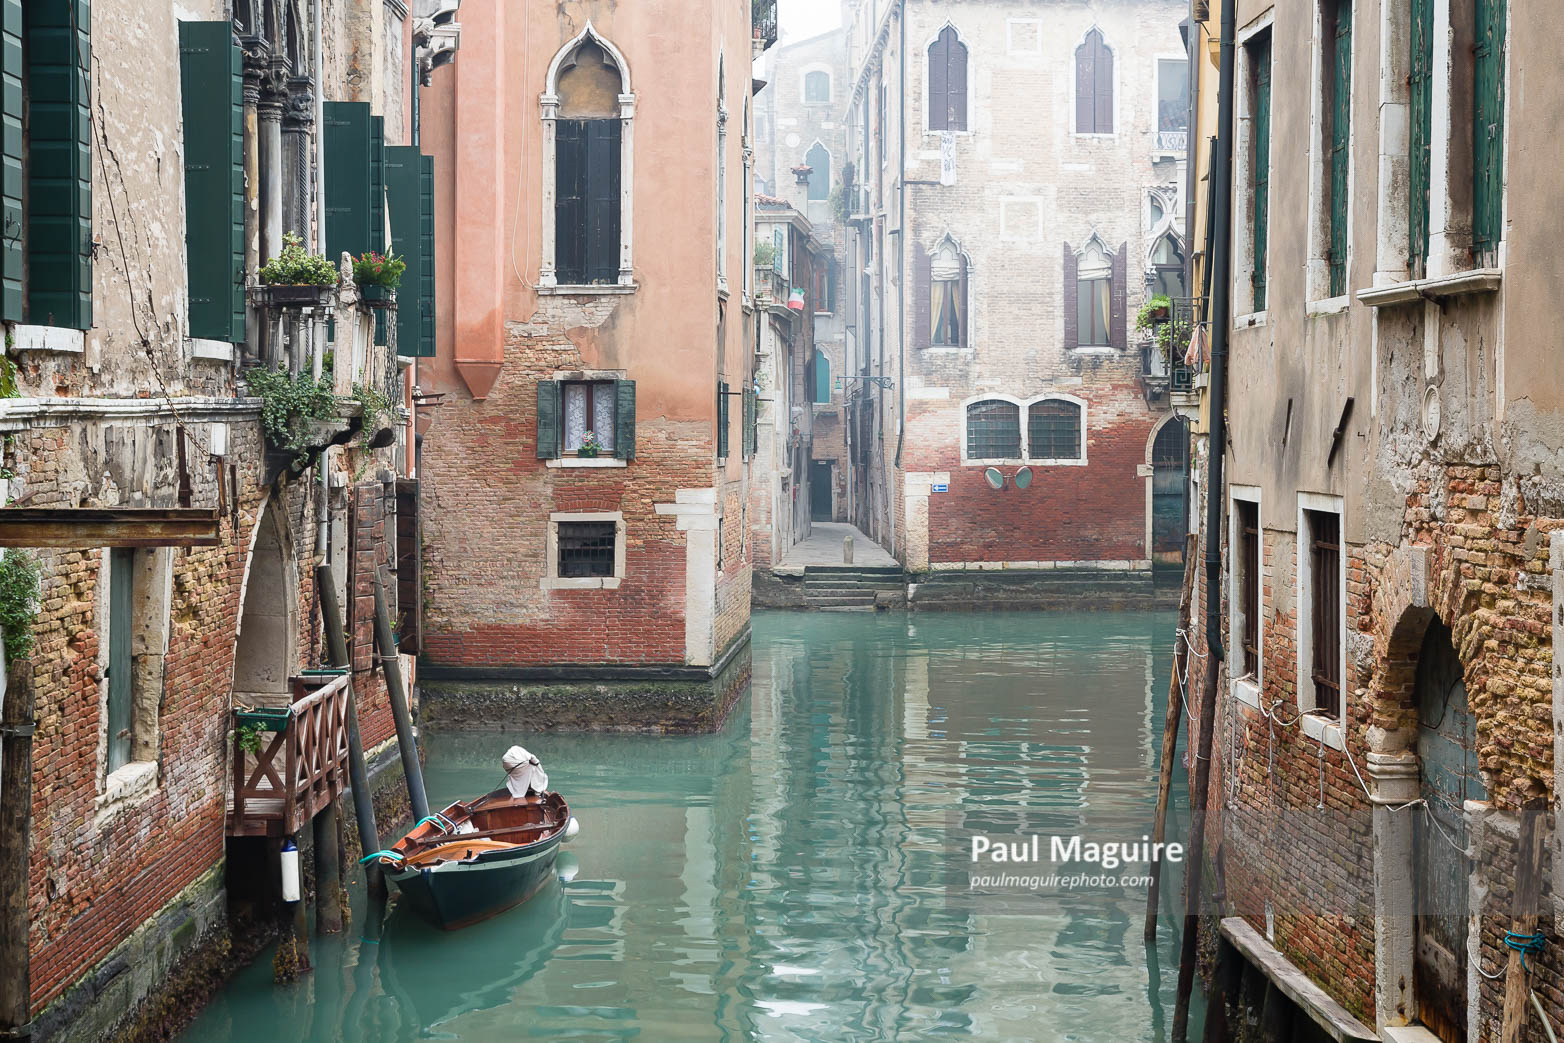
For my Job Identifiers, I use a simple descriptive name. Photos can still be found easily by capture date, so I never include the date in the Job Identifier. For instance, my 4-day trip to Venice was named simply as Venice.
At any time I can divide a Job into further, smaller Jobs, by selecting a subset of photos and editing the Job Identifier. I like to use an informal, sometimes hierarchical format. For instance, I split Venice into several Jobs: Venice Rialto Bridge, Venice details, Venice gondolas, etc.
The beauty of using this method is that Job Identifier is not tied to folders or dates in any way. Sticking with my Venice trip as an example: I inevitably took photos of gondolas on several different days and at different locations. By assigning them all to the Job Venice gondolas, with one click I can see them all together and edit them down to the best.
The cool thing is that like all metadata, Job Identifier is referenced in the Lightroom search tool. So if I were to search “gondolas,” I get photos from this job, as well as the photos that I shot on a previous trip to Venice. There is no reason your Job Identifiers have to be unique. In fact, if you shoot a subject or project on more than one occasion, giving those photos the same Job Identifier is an easy way to gather them up together. Think of Job Identifier as the “project” name.
How to prioritise jobs
Hopefully you’ve seen that using Job Identifier is a much quicker, easier and more flexible way to organise photos than with folders or collections. But what about prioritising those Jobs? We don’t have the ability to assign a colour label to a Job like we do with folders and collections, but that’s OK: there is another way.
This is where I do use collections… to manage my workflow. I’ve set up a collection set called Workflow, and created within it the following collections:
- **1 Best
- **2 Rest
- **3 Defer
- **Done
- **Exclude
The asterisks are important, as I reference these with smart collections. It doesn’t have to be two asterisks, just something unique that you don’t use in other collection names.
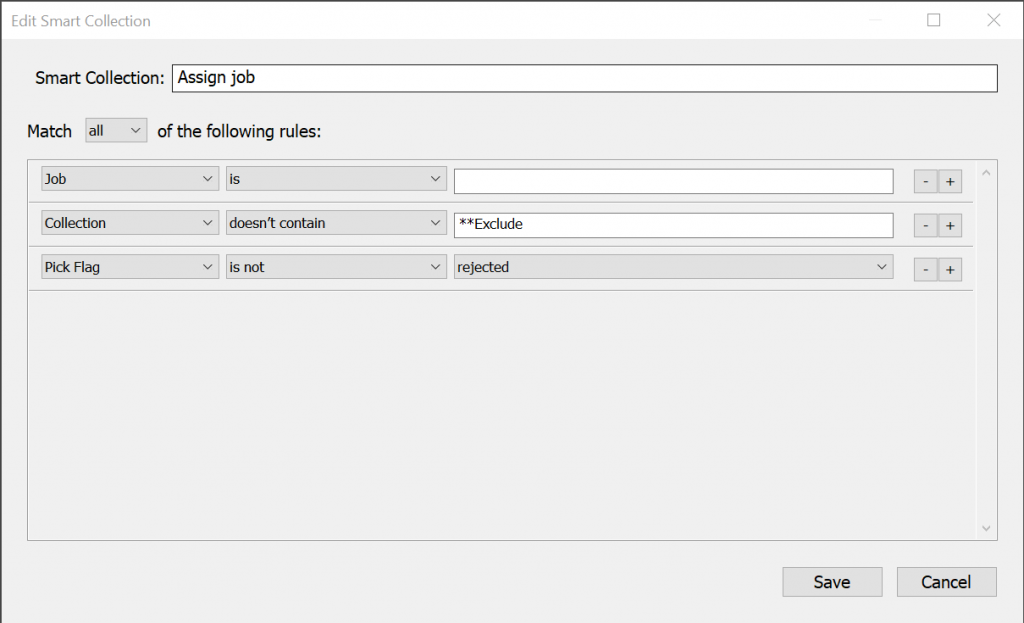
The trick is to create two smart collections to manage your photo workflow: the first, to identify photos that have not been assigned a Job Identifier. The second contains your Jobs that need to be prioritised:
Firstly, create a smart collection within Workflow called Assign job, and give it the following rules:
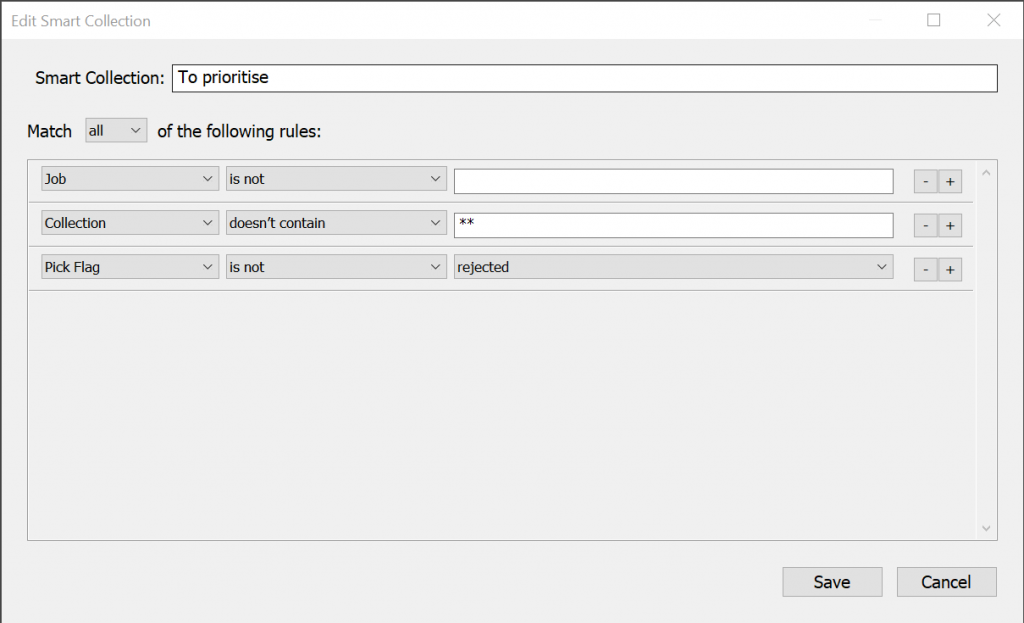
Secondly, create another smart collection within Workflow, called To prioritise, and give it these rules:
Using the workflow
Start by selecting the smart collection Assign Job and work through your backlog. Give every set of photos a Job Identifier. You simply select the photos, then type a name into the Job Identifier metadata field. They now belong to a Job so they will disappear from this smart collection. Move on to the next set of photos.
If your database is large then it can take a lot of time to work through all your photos, but it is definitely worth the effort. I make things easier by setting **Exclude as the “target collection”. Then if there are a bunch of photos that I know I don’t want to work on, I can just hit “B” and the photos are assigned to **Exclude. That means they also disappear instantly from the Assign Job smart collection. (I do this for all snapshots or phone photos that are not relevant to my professional work.)
Once you’ve assigned a Job Identifier to all your photos, it’s time to prioritise them. Select the To Prioritise smart collection that you created earlier. Use the filter bar as shown above to filter by one Job at a time. Select all the photos in that Job and drag them to one of your priority collections. At this stage you’re not looking to rate individual photos. Instead, think about each series of photos and how worthwhile it will be to work on them. Remember, there is nothing to stop you from splitting up the Job further at any time, or even assigning different priorities to different sets of photos within a single Job.
When you’ve prioritised all your Jobs, then is the time to really go to work.
Select your collection **1 Best and, using the filter bar as before, start working on your photos one Job at a time. I like to filter by year too, so I start with the best Jobs from this year and work backwards from there.
Use ratings and/or the pick flag as you see fit, then process your “selects” and give them metadata such as a caption. You can then add them to a collection of finished products. Alternatively, I prefer to use colour (XMP) labels to indicate that a selected photo has been finished: red for Lightroom-only edits, green for files that were taken into Photoshop.
When you’re done with the Job, select all the photos in the Job (not just your selects) and drag them into **Done. Alternatively, if you think there are more photos in that Job that are worth a look, but you don’t want to work on them right now, then drag them into a lower priority collection.
Finally, remember to unassign them from collection **1 Best.
This approach really forces you to work only on your best shots. You are not even going to look at **2 Rest until you have finished everything in **1 Best. As for **3 Defer: you may not get the time to ever work on them. But that’s a good thing. These are your mediocre photos that rob you of your time and motivation. You haven’t deleted them, so you can sleep sound in the knowledge that they are still there if you ever want to take another look.
Handling new photos
In the introduction I promised to show how you can prevent a backlog from building up again in future. The solution is simply to continue using this workflow! As you import new photos into Lightroom, they will automatically appear in the smart collection Assign Job. Give them a Job Identifier, and assign a priority just like you did with your backlog. Then just make sure you keep working on your top priority sets, rather than eagerly diving into your latest pics regardless of their quality.
Summary
I hope this article has given you some ideas on how to tackle the problem of staying on top of all your photos. I am still working through my backlog. I may never get to my lowest priority photos, but that really is the point. Long before I get to those “deferred Jobs,” I know that I will have already uncovered the best work in my archives. I am then free to concentrate on planning the next shoot.
If you found this article helpful, check out my related posts:
The best folder and file naming conventions for photographers, and more